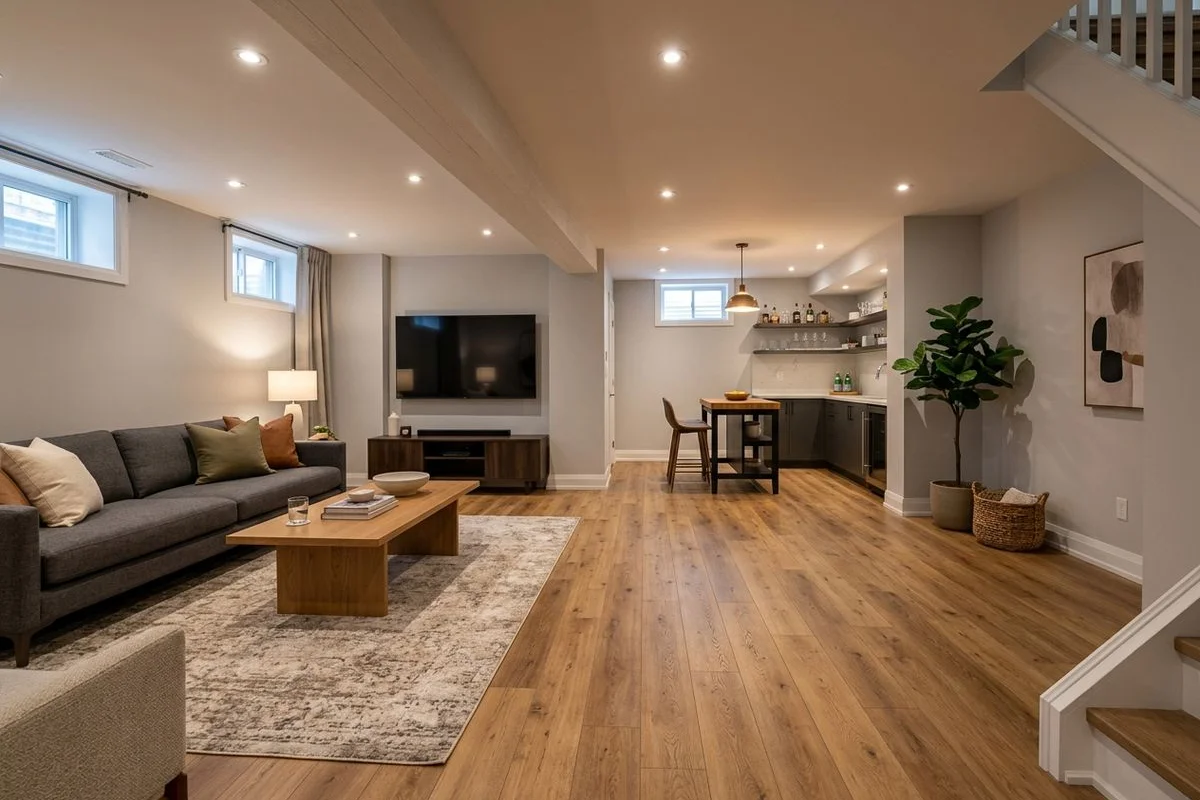
Why Toronto basements need waterproof flooring
Toronto’s geography creates a specific challenge for basement floors. The city sits on clay-rich lakeshore deposits with relatively high groundwater levels. The freeze-thaw cycle of a Toronto winter - sometimes 30-40 freeze-thaw events per season - followed by spring snowmelt creates reliable and predictable seasonal moisture pressure against basement foundations. Most Toronto homes built before 1980 have minimal exterior waterproofing by current standards.
The practical result is that most Toronto basements experience some degree of seasonal moisture, even when they appear dry. Below-grade humidity in unmanaged Toronto basements runs 65-80% RH during summer months. More critically, a single event - sump pump failure, floor drain backup, window well overflow during a heavy rain - can put 1-3cm of water across a basement floor within hours.
This is the environment that flooring installed in a Toronto basement must survive. Hardwood and standard laminate are destroyed by standing water. LVP with SPC rigid core floats on top, dries off, and is undamaged. This is why LVP dominates Toronto basement installations.
Toronto Quality Wood Flooring installs SPC LVP in Toronto basements using a specific protocol developed for our local climate and building stock. Our luxury vinyl plank flooring page covers the full service. For the full three-way comparison with laminate and hardwood, see our LVP vs laminate vs hardwood guide.
What SPC means and why it matters below grade
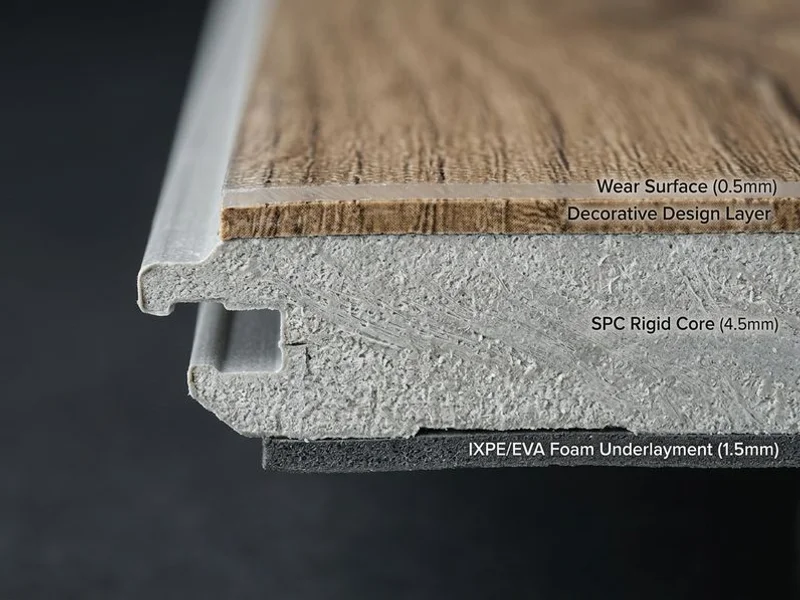
SPC stands for Stone Plastic Composite. The core of an SPC LVP plank is a dense mineral-filled layer of limestone powder bonded with PVC. It is 100% waterproof throughout the core, top to bottom. This is the structural property that distinguishes SPC from two other vinyl categories:
WPC (Wood Plastic Composite): Similar to SPC but uses wood flour rather than limestone in the core. WPC is softer, quieter underfoot, and somewhat more comfortable. But the wood flour content makes it slightly less dimensionally stable in temperature extremes and slightly less durable under concentrated loads. WPC is appropriate for above-grade living rooms and bedrooms; SPC is the correct specification for basements.
Standard HDF laminate: The moisture-sensitive product that LVP replaces for below-grade use. HDF absorbs moisture and swells - the core failure mode that SPC eliminates entirely.
The wear layer thickness is the second critical specification for basement LVP. This is the clear protective layer above the printed design. Residential-grade SPC comes in 12-mil, 20-mil, and 28-mil wear layers:
- 12-mil: Appropriate for light-use basement spaces (home offices, guest bedrooms with minimal traffic)
- 20-mil: The standard specification for Toronto finished basement family rooms, children’s play areas, and home gyms
- 28-mil: Commercial-grade, occasionally specified for very high-traffic residential spaces
COREtec Plus HD (20-mil wear layer) is the most common specification Toronto Quality Wood Flooring uses for finished basement installs. For high-end condominium basement renovations, Karndean Korlok provides a premium-tier option with exceptional grain realism and a robust wear layer.
Concrete subfloor preparation for LVP
LVP is more tolerant of subfloor variation than engineered hardwood, but it still requires proper preparation. The standard flatness requirement is 3mm over 1.8m (3/16 inch over 6 feet).
Flatness correction: High spots are ground down with a floor grinder. Low spots exceeding 3mm are filled with self-levelling compound and allowed to cure for 24 hours before LVP is installed. SPC LVP will bridge minor variations (1-2mm) without issue; larger variations create pressure points under the rigid core that cause click-lock joints to crack over time.
Moisture testing: ASTM F2170 in-situ probe testing determines slab relative humidity at depth - a more reliable measurement than surface calcium chloride tests, which only read surface emission. SPC LVP can tolerate slab RH up to approximately 95% without structural damage to the plank itself, because the core is waterproof throughout. However, moisture trapped between the vapour barrier and a saturated slab can generate mould under the floor regardless of the LVP’s waterproof rating. For this reason, moisture testing and a proper vapour barrier remain mandatory even with SPC products.
Vapour barrier: 6-mil polyethylene sheeting, overlapped 200mm at joints and taped. Where the SPC LVP has integrated underlayment attached to each plank, a separate vapour barrier may be specified by the manufacturer - follow the product documentation. Adding both separate poly and integrated underlayment creates the stack effect (excessive cushion causing joint loosening under traffic) and should be avoided.
Underlayment for basement LVP
For floating SPC LVP installations, a thin vapour-barrier underlayment (1-3mm foam or cork with integrated poly film) provides minor surface correction and acoustic performance. The underlayment does not add meaningful waterproofing - the SPC plank provides that - but it does cushion the impact of foot traffic and improve IIC ratings.
IIC ratings matter in Toronto condominiums. Most Toronto condo buildings require a minimum IIC rating for flooring installations. Common minimums:
- Typical condo buildings in Midtown and Etobicoke: IIC 55 minimum
- Higher-specification downtown and Humber Bay towers: IIC 67 required
IIC 55 is achievable with SPC LVP plus a quality cork or rubber acoustic underlayment. IIC 67 requires a premium acoustic underlayment system. Specify the building’s requirement before purchasing any underlayment product.
Some SPC LVP products come with pre-attached underlayment. Where this is the case, no additional underlayment layer is needed. Installing additional underlayment over pre-attached underlayment creates excess cushion that stresses click-lock joints.
Recommended SPC products for Toronto basements
Based on installation experience across Toronto-area projects:
COREtec Plus HD - The most widely specified SPC product for Toronto finished basements. Available in 20-mil wear layer. Dense, durable core with pre-attached underlayment. Excellent grain photography in the wide-plank formats (7-9 inch).
LifeProof (Home Depot exclusive) - A cost-competitive SPC option with 20-mil wear layer. Good performance for budget-conscious basement projects.
Karndean Korlok - Premium-tier SPC favoured in high-end condo renovations and finished basements in Leaside, North York, and Etobicoke where resale presentation matters. Exceptional grain realism and thicker wear layer.
Shaw Floorté - Mid-to-premium SPC with a range of wear layer options. Widely available through flooring distributors in the GTA.
Thermal comfort in Toronto basements
LVP is colder underfoot than real hardwood. Vinyl has a higher thermal mass than wood fibre, and a concrete slab below the floor compounds this. A basement LVP floor in January in a Toronto home without in-floor heat will be noticeably cold compared to a hardwood floor in the rooms above.
Two solutions:
Electric in-floor heating mat: An electric resistance heating mat installed directly on the concrete slab and covered by the vapour barrier and LVP, connected to a programmable thermostat. This is the most common solution for finished Toronto basements. Operating cost depends on mat size and thermostat settings - a 1,000 sq ft basement with heating mat running 8 hours per day adds approximately $50-100/month to hydro costs in winter.
Radiant in-floor heat: Hydronic in-floor systems under LVP are possible with SPC products. Check the manufacturer’s maximum surface temperature specification - typically 27°C (80°F). Do not exceed this limit or the SPC core will begin to soften over time.
Full product comparison for Toronto basements
| Product | Waterproof | Slab RH tolerance | Wear layer | Cost installed | IIC (with underlayment) |
|---|---|---|---|---|---|
| Standard laminate | No | 75% | AC4 (surface only) | $3-5/sq ft | 30-40 dB |
| Moisture-resistant laminate | Resistant only | 80% | AC4-AC5 (surface only) | $3-6/sq ft | 30-45 dB |
| SPC LVP (12-mil) | Yes | 95% | 12 mil | $4-7/sq ft | 42-52 dB |
| SPC LVP (20-mil + underlayment) | Yes | 95% | 20 mil | $5-9/sq ft | 52-65 dB |
| Engineered hardwood (3mm wear) | No | 75% | 3mm real wood | $6-10/sq ft | 45-55 dB |
For most Toronto basement projects, 20-mil SPC LVP with a quality acoustic underlayment is the specification that balances performance, IIC rating, thermal comfort, and cost most effectively.
Get your basement LVP estimate
Toronto Quality Wood Flooring provides free in-home consultations for basement LVP projects. We assess slab moisture conditions, confirm the IIC requirement for your building type, and recommend the right product for your specific basement. Fixed-price written quotes are returned within 48 hours of the in-home visit.
Contact us to book your assessment and start planning your basement floor.